










The first things to learn in Star Wars: Galactic Racer are the basic controls: R2 to accelerate, □ to Drift, and × to boost. Boost comes in two types, Afterburner and Ramjet, and you switch between them with R3. Ramjet is faster but builds up heat, and if you don’t let go once the gauge turns red, you’ll blow up.
In the campaign, losing sends you back to the first planet of the chapter. However, the upgrades you’ve made to your vehicle (stats raised with Tuning Points) carry over, so every attempt gets a little easier to win.
- Vehicle List: how the 4 types differ and how to unlock them
- Parts List: effects, rarity, and shop prices for all 245 parts
- Ability List: effects of all 45 abilities and their upgrade paths
- All 14 Racer Styles: starting abilities and traits
What are the controls?
Here are the default controls. The PC version can also be played with a keyboard and mouse.
| Action | Controller | Keyboard and mouse |
|---|---|---|
| Accelerate | R2 | W |
| Brake | L2 | S |
| Steer | Left stick | A / D |
| Drift (Advanced Maneuver) | □ | Space / Right-click |
| Boost | × | Left Shift |
| Switch boost type | R3 | Left Ctrl / C |
| Pitch the vehicle in midair | Left stick up/down | Right Shift / Right Ctrl / mouse up/down |
| Select an ability | D-pad | ↑←↓→ / 1–4 / mouse wheel |
| Activate an ability | L1 | E / Q / Left-click |
| Recover from a Critical Malfunction (boost and abilities stop working) | ○ | R |
| Change camera | R1 | Insert / mouse wheel click |
| View your build (installed parts, etc.) | Touchpad | Tab |
| Pause | OPTIONS | Esc |
What the □ Advanced Maneuver does depends on your Vehicle Type.
- Landspeeder: Drift
- Speeder Bike: Kinetic Burst. Slows you down while you turn, then speeds you up when you let go
- Skim Speeder: Knife Edge. Banks the craft hard into the turn
- Podracer: Air Brake. Lets you turn tighter, but costs you speed
When you switch boost type, the HUD changes color. Gold means Afterburner, and blue means Ramjet.
Want to accelerate with a button? Use the Alternate scheme
The default controls use the triggers to accelerate and brake. To accelerate with a button instead, go to Controls in the settings and set Control Scheme to Alternate. These are the buttons that change:
| Action | Default | Alternate |
|---|---|---|
| Accelerate | R2 | × |
| Brake | L2 | ○ |
| Boost | × | R2 |
| Switch boost type | R3 | R1 |
| Change camera | R1 | R3 |
| Recover from a Critical Malfunction | ○ | △ |
There’s no option to remap individual buttons. On PC, you can remap them through Steam’s controller settings, but the on-screen button prompts stay the same.
Settings worth changing first
The Accessibility settings include options that make the controls easier. Until you get used to the game, changing the following makes racing a lot more comfortable.
Boost Mode: Each press of the boost button toggles it on or off, so you don’t have to hold it down. You no longer have to press □ for Drift and × for boost at the same time with one thumbAcceleration Mode: Press the accelerate button once and you keep accelerating. Press the brake to stopAuto-Deactivate Ramjet: The Ramjet shuts off automatically just before it would explodeTakedown Cutaway Cameras: Turn this off and the camera won’t cut away when you land a takedown, so you can keep driving without interruptionSimple Pre-Race Checks: Simplifies the button sequence you press before the start
What should you watch on the HUD during a race?
The boost gauges and your remaining Crashes are shown along the bottom edge of the screen.
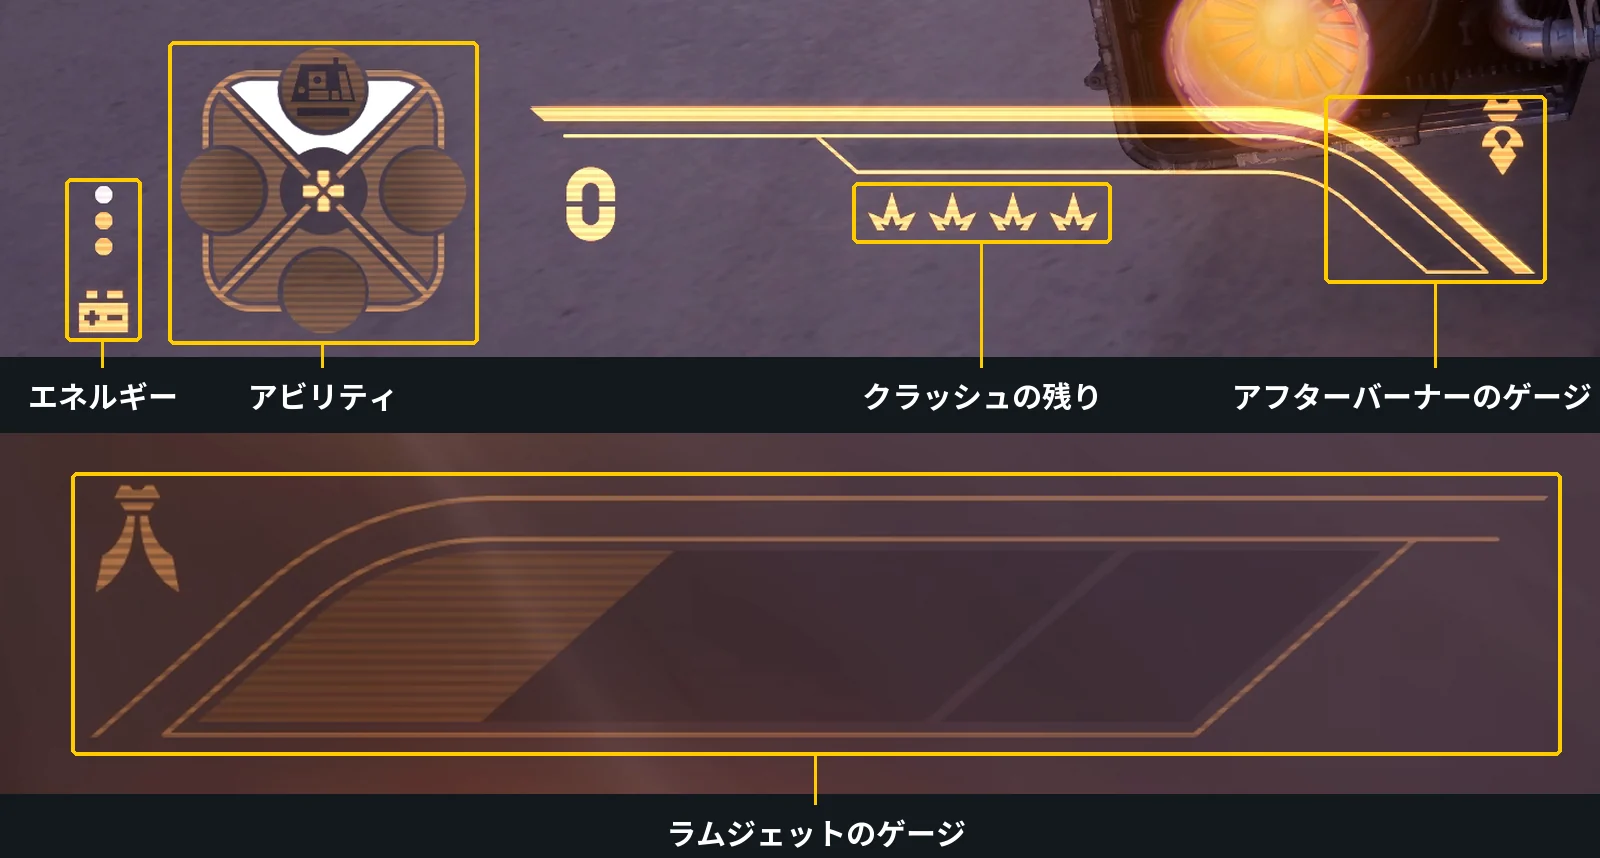
- Crashes remaining: how many more times you can crash in this race
- Afterburner gauge: how much is left in the tank
- Ramjet gauge: how much heat has built up
- Energy: what you spend to activate abilities
What’s the difference between Ramjet and Afterburner?
Here’s how the two boosts differ.
| Afterburner | Ramjet | |
|---|---|---|
| Speed | Normal | Fast |
| Using it | Drains the tank | Builds up heat |
| If you overdo it | The tank just runs dry | Too much heat makes it explode, and you Crash |
| Recovery | Refills gradually over time. A takedown refills it completely | Heat drops while you’re not using it |
Until you get used to it, use Afterburner most of the time and save Ramjet for short bursts on straights. Steering gets harder while the Ramjet is on.
Let go when the gauge turns red
When the Ramjet gauge turns red, release the button right away. Keep using it in the red, and within a few seconds you’ll explode and Crash. Let go for a moment, and once the heat drops, you can use it again.
While you’re still getting a feel for it, turn on the Auto-Deactivate Ramjet setting covered above.
Where heat drops and where it rises
Ramjet heat also changes depending on where you’re racing.
- Drops: while you’re airborne off a jump, in shade, and in water
- Drops, but steering gets harder: icy areas (Frozen)
- Rises sharply: near lava or fire (Burning)
- Can’t be used: when you touch acid (Corroded). Stay in contact and you’ll Crash
The Vent and Surge abilities can also cool down your Ramjet.
Earn boost from takedowns, Pre-Race Checks, and landings
- Takedown: Slam into an opponent and make them crash, and your Afterburner tank refills completely
- Pre-Race Checks: Before the start, Afterburner and ability panels appear at the top left of the screen, each with a row of buttons. Complete the Afterburner panel and you start the race with a full tank; complete the ability panel and you get a bonus that depends on the ability (First Activation Amplified for Shield)
- Perfect Landing: Land a jump with your vehicle parallel to the ground to get a short boost. In the air, push the left stick up or down to correct your pitch
Some parts also kick in every time you land a takedown. Scrap Recycler restores Energy with each takedown, and Fuel Agitator raises your Afterburner‘s power. Parts that work off takedowns are grouped under “Takedown” in the Parts List.
How do abilities work?
Abilities are gear you deploy yourself during a race, such as a Shield or mines. Choose an ability with the D-pad and activate it with L1. You can equip up to four, one for each direction on the D-pad: up, left, down, and right.
The one exception is the Crash Ability, which triggers when you crash: it uses no Energy and fires automatically without a button press.
There are 45 abilities in all, and you get them from Ability Packs in the shop and in rewards.
Effects, how to get each one, and upgrade paths are covered in the Ability List.

Racer Styles are presets with different combinations of abilities and traits, and new ones unlock when you meet their conditions. Some of those conditions only progress when you trigger abilities yourself, such as the number of seconds spent Shielded. All 14 styles’ traits and unlock conditions are listed in All 14 Racer Styles.
How does the campaign (the League) work?
The campaign is a roguelite mode in which you fight your way up a galactic racing league. When you lose, you lose the gear you collected on that attempt and start over from the first planet of the chapter. Vehicle stats raised with Tuning Points carry over, so you get stronger every time you try again.
The campaign is split into three chapters, and each chapter takes you through a fixed series of planets in order. On screen, the chapters are labeled Act I to Act III, and a single attempt at a chapter, starting from its first planet, is called a tour.
| Chapter | Name | Planets |
|---|---|---|
| Act I | The Qualifier | 4 (starting with Jakku) |
| Act II | The Galactic League | 5 (starting with Sentinel I) |
| Act III | Kestar’s Galactic League | 6 (starting with Lantaana) |
Win through to Derven Acos, the chapter’s last planet, and the story moves on to the next chapter. The only way to advance the story is to win that chapter’s tour all the way to the end. You never have to replay a chapter once you’ve cleared it.
The Act I final is a one-on-one race against Sebulba on Derven Acos. For how to prepare and win, see How to Beat Sebulba.
How a tour plays out
- At the start: choose your Vehicle Type, Racer Style, Favors (up to 3), and difficulty
- On each planet: pick your route on the map and work through races, Eliminators, Field Tests, Mystery Encounters, shops, and more. The map is regenerated every tour
- After events: collect parts, abilities, and +1 Upgrades from reward packs and shops to build up your vehicle
- When you run out of League Tokens: you’re knocked out, the tour ends, and the gear you collected is gone
The combination of parts and abilities you put together over a tour is your build in this game. You can browse every part in the Parts List and every ability in the Ability List.
Permanent upgrades vs. upgrades that last only one tour
There are two ways to raise your vehicle’s stats, and the difference is whether they last. Both extend the same six stat bars (Afterburner, Ramjet, and so on).
| Tuning Points | +1 during a tour | |
|---|---|---|
| Where you spend them | Outside a tour, on the vehicle select screen | During a tour, from reward and shop packs |
| How you get them | Earned by completing events | Pick 1 of the 3 in a pack |
| Do they last? | Permanently (per Vehicle Type) | Only for that tour |
| When you lose | Kept | Lost when you’re knocked out |
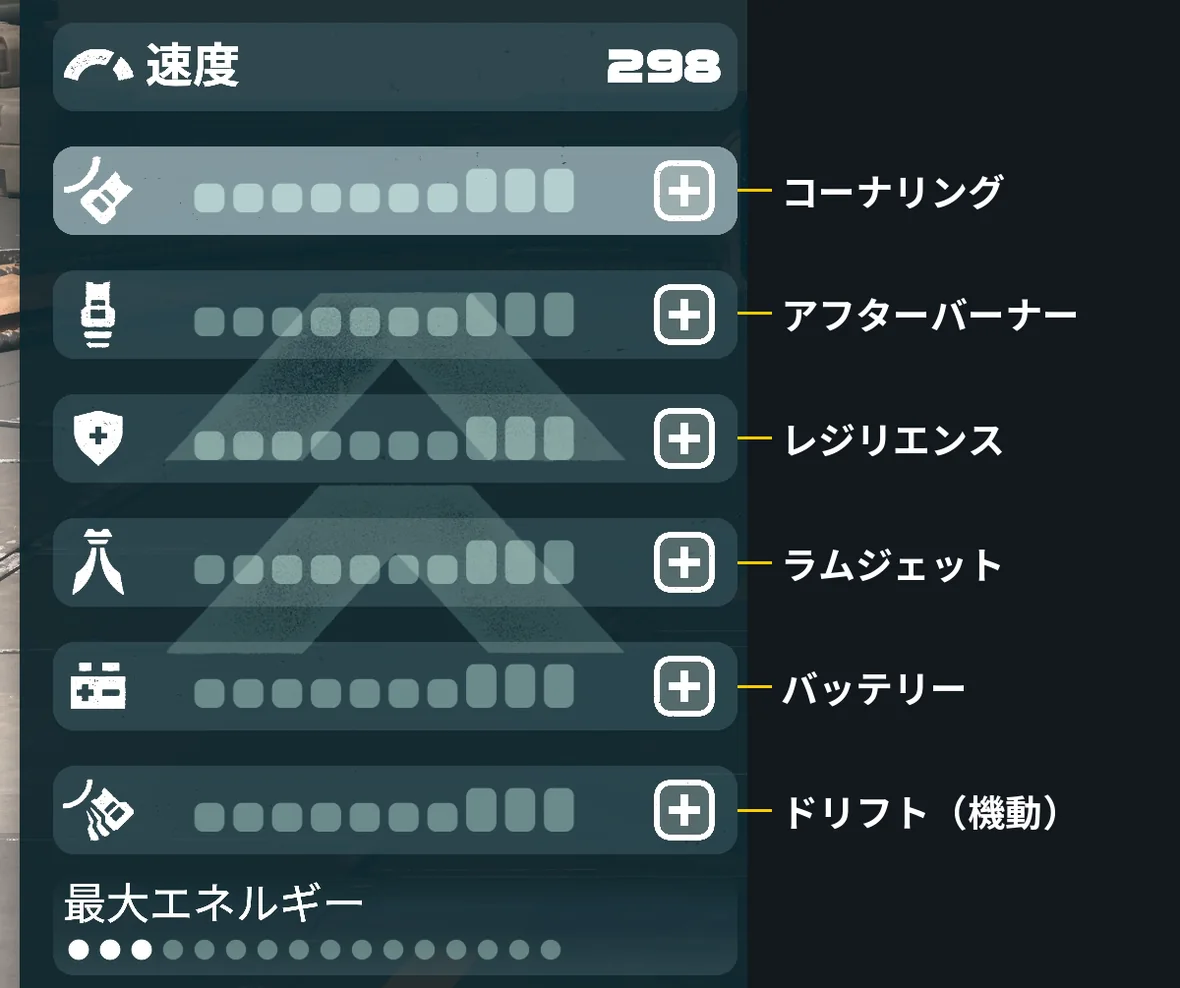
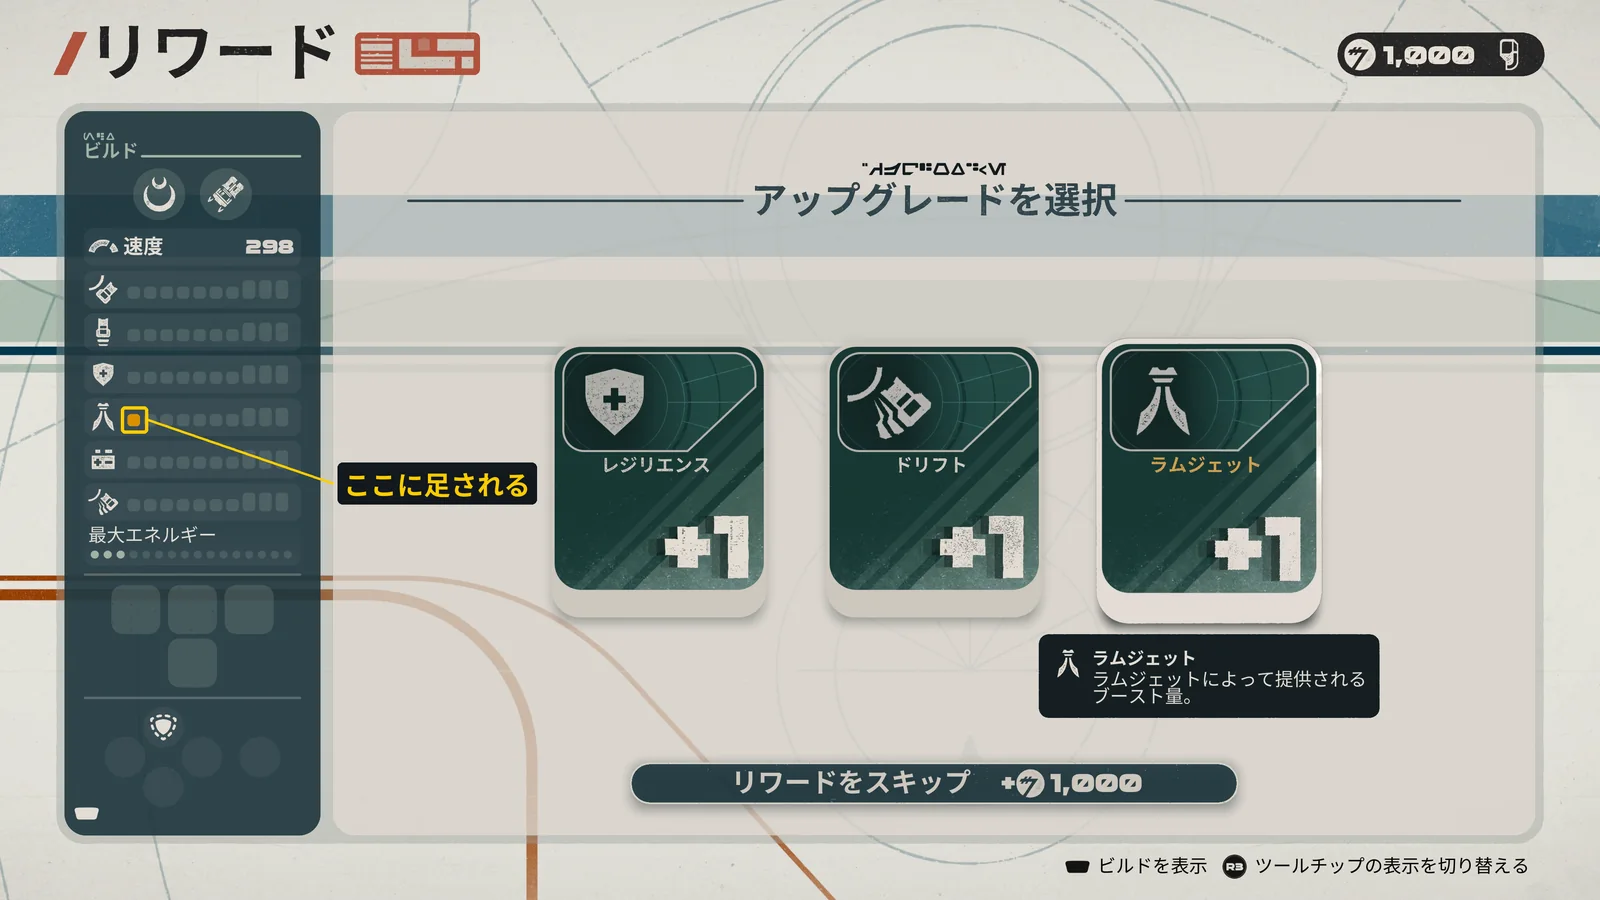
A +1 from a tour is a temporary upgrade added on top of what you’ve raised with Tuning Points. It disappears when the tour ends, so in the next tour, all you can count on is what you’ve raised with Tuning Points.
If you’re stuck on a chapter, the standard approach is to run a few tours, bank Tuning Points, and raise your vehicle’s base stats before you push through.
New parts and Racer Styles also unlock based on how many events you’ve cleared and how you race, so the more runs you do, the more options you get. For the order to spend points in and which +1s to take during a tour, see Best Upgrades: Tuning Point Order and +1 Picks.
What happens when you lose?
When you run out of League Tokens, you’re knocked out and have to restart your current chapter from its first planet. You don’t have to replay chapters you’ve already cleared.
When you lose a League Token
You start a tour with only one League Token. You lose it in any of the following cases, and the moment you have none left, you’re knocked out.
- You’re Wrecked in a race
- You finish 4th or lower in an Eliminator
- You accept a rival’s Head-to-Head challenge and lose
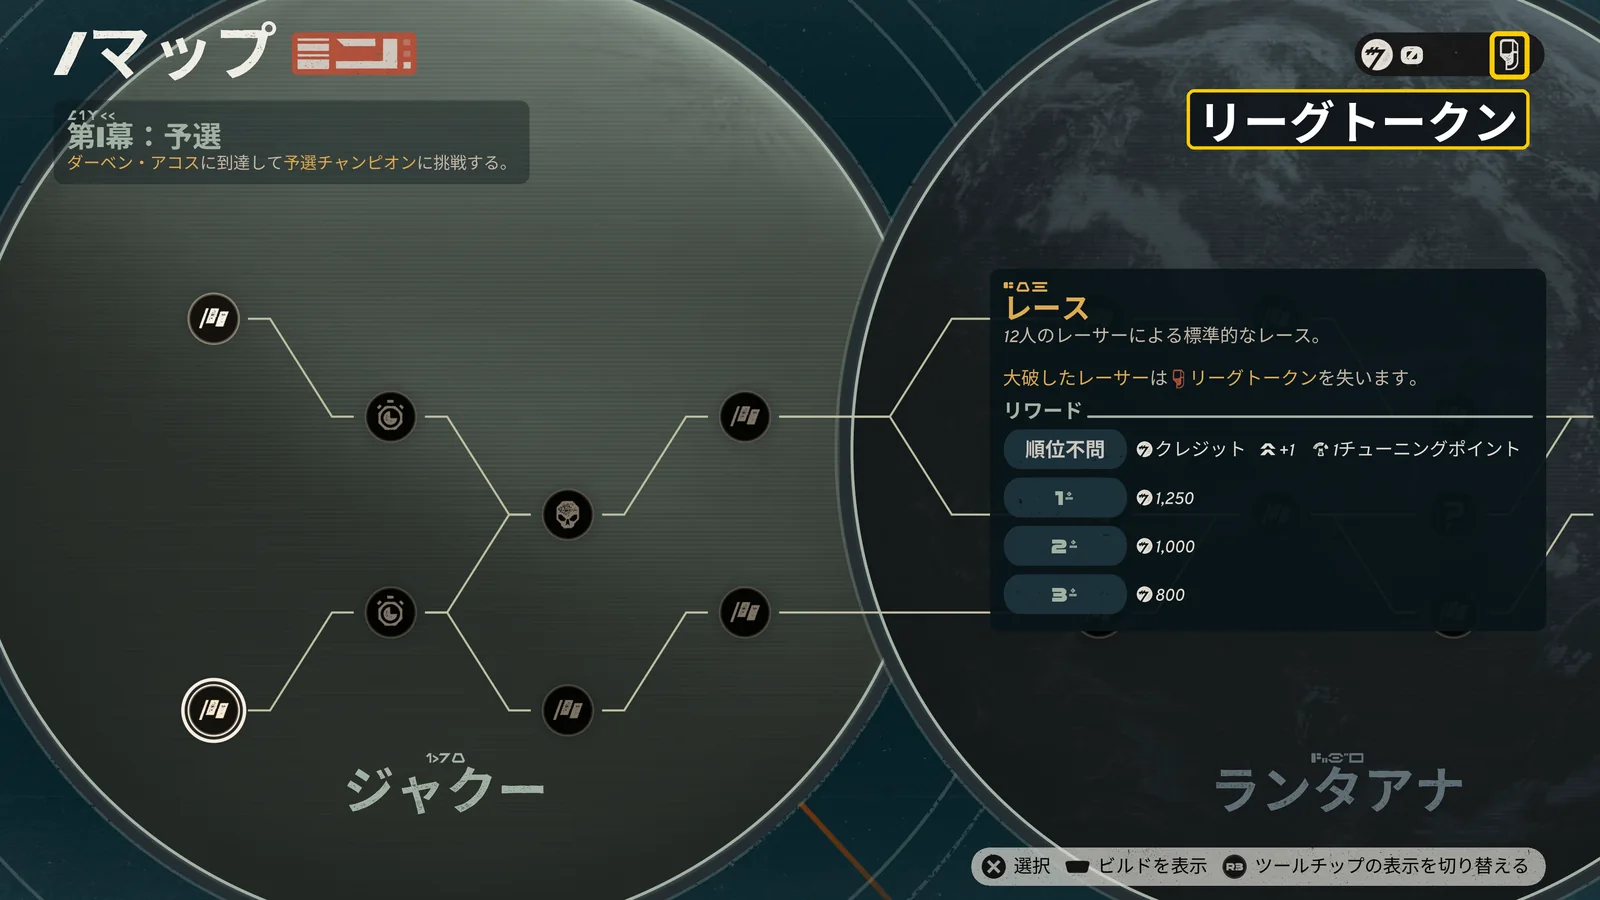
You gain one token by winning a Head-to-Head against a rival. Some of the Favors you can equip at the start of a tour (bonuses you earn as you progress through the campaign) also add tokens.
The Favors that add tokens, and how to get them, are covered in the Favor List.
The Favors that add tokens, and how to get them, are covered in the Favor List.
In a normal race, any position is fine as long as you finish
In a normal race, you won’t lose a token no matter where you finish. You only lose one if you’re Wrecked.
A Crash is when your vehicle breaks down from slamming hard into a wall or an opponent, or from exploding, and each event allows only a set number of them. Crash once more after you’ve used them all up, and you’re Wrecked. When you’re running low, focus on finishing the race rather than on your position.
What you keep after a knockout
| Kept | Lost |
|---|---|
| Vehicle stats raised with Tuning Points | Parts installed during that tour |
| Unlocked parts, abilities, Favors, and Racer Styles | Upgrades applied during that tour |
| Credits earned by scrapping your vehicle | Abilities equipped during that tour |
When you’re knocked out, the vehicle you were driving is automatically scrapped and turned into Credits, the in-game currency. You can spend those Credits on your next tour.
What if your opponents are too fast to beat?
Use Tuning Points to strengthen your boosts, and if you still can’t win, lower the difficulty.
Put Tuning Points into boost first
Tuning Points are points for upgrading your vehicle that you earn by completing events (1 for a race, 4 for an Eliminator).
If you feel like you can’t keep up, start by putting points into Afterburner and Ramjet. Upgrades are tracked separately for each Vehicle Type, such as the Landspeeder, so concentrating them on the one vehicle you use most makes you stronger faster. You can reset your allocation at any time (each reset costs 2 points).
For what each of the six stats does and how many points each level costs, see Best Upgrades: Tuning Point Order and +1 Picks.
Next, put points into Resilience, which makes you tougher against status effects. Sentinel I, the first planet of Act II, has rivers of acid: touching the acid disables your Ramjet, and staying in it makes you Crash. Raise it before you reach Sentinel I.
Pick parts that trigger on the same conditions
Parts are equipment you buy one at a time with Credits in the shop, and you can install up to four on a vehicle. Every part works on a condition such as “when you do X” or “while X,” so combining parts whose conditions link up stacks their effects.
For example, Cooling Actuator is a part that makes you Cooled when you land a takedown. Ramjet Accelerator raises your Ramjet’s power while you’re Cooled. Install both, and your Ramjet gets stronger with every takedown.
If your current vehicle doesn’t suit you, switch Vehicle Types on your next tour. The Landspeeder, Speeder Bike, and Skim Speeder differ in Top Speed, acceleration, and Cornering, as well as in maneuvers such as Drift.
You can’t choose the Podracer as your tour vehicle. You can only race one in the podracer events that come up as the story progresses.
The Vehicle List compares the four types’ stats and unlock conditions.
Still can’t win? Lower the difficulty
There are four difficulty levels, and you can only change the difficulty when starting a tour. The biggest difference is how many Crashes you’re allowed per event.
| Difficulty | Crashes allowed | Opponent skill and aggression |
|---|---|---|
| Cadet | 5 | Low / infrequent |
| Pilot (Recommended) | 3 | Standard |
| Ace | 2 | Higher skill |
| Champion | 5 (not refilled every race; 3 are restored on each planet) | Both at maximum |
If you keep getting knocked out, drop to Cadet for your next tour. Champion becomes available once you complete the campaign.
Is it OK to quit partway through?
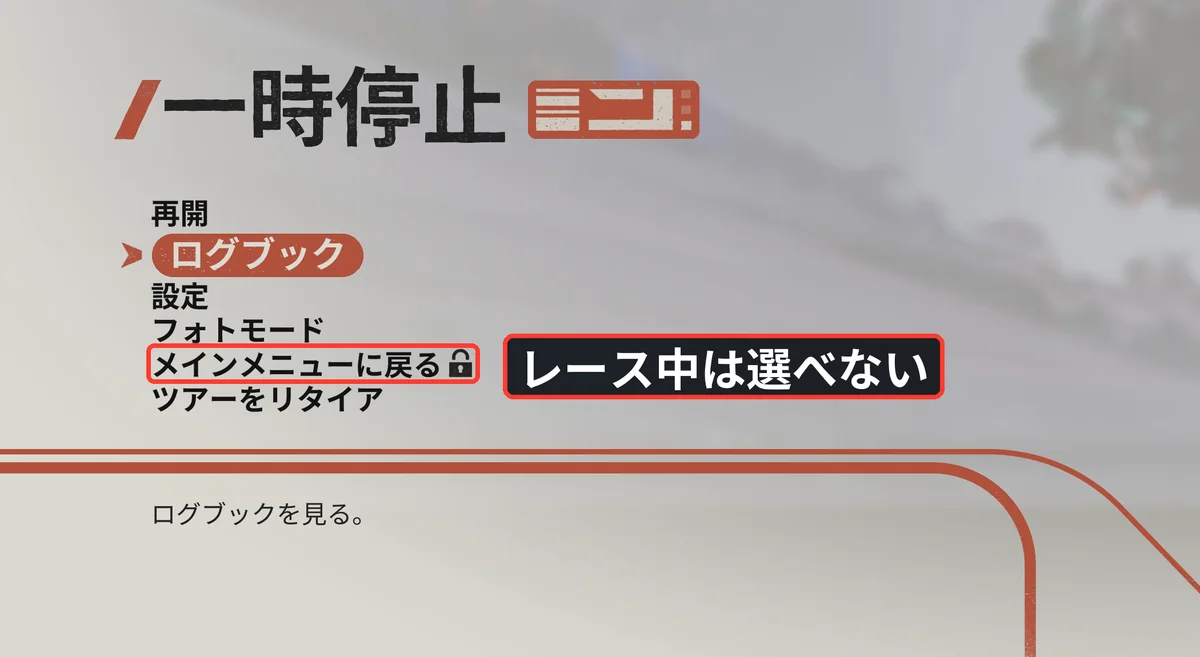
Yes. The game saves automatically after every event. If you quit with Exit to Main Menu in the pause menu, you can pick up where you left off next time.
However, you can’t select Exit to Main Menu in the middle of a race (it shows a lock icon). To quit, wait until the race is over and you’re back on the map screen. Abandon Tour in the same menu ends the tour itself, so don’t choose it if you just want to take a break.




Comments